Homework:
1. Read ch. 1 in Dreamweaver Visual Quickstart Guide


Dreamweaver Interface
Introduction to Dreamweaver CS5: Getting Started
Welcome to the world of Dreamweaver! Dreamweaver is the premiere Web design and development tool from Adobe. Once you understand what all the parts of its interface do, you'll soon find that Dreamweaver is an invaluable application for creating and maintaining Web sites.
Dreamweaver is a professional HTML editor for designing, coding, and developing websites, web pages, and web applications. Whether you enjoy the control of hand-coding HTML or prefer to work in a visual editing environment, Dreamweaver provides you with helpful tools to enhance your web creation experience. Dreamweaver is a WYSIWYG (What You See Is What You Get) HTML generator.
Dreamweaver is generally recognized as the industry standard tool for web page authoring. Dreamweaver is a program that has found favor among not only designers but also programmers.
When you make a page in Dreamweaver you can see the results of what you have done immediately as opposed to hand-coding HTML with a text editor and then having to open your page in a web browser to see the results.
The visual editing features in Dreamweaver let you quickly create pages without writing a line of code. You can view all your site elements or assets and drag them from the easy-to-use Files panel directly into a document. You can streamline your development workflow by creating and editing images in Image Editing software packages such as Adobe Photoshop or Fireworks, then importing them directly into Dreamweaver, or by adding Flash objects you create directly in Dreamweaver.
Dreamweaver now helps you to build dynamic database-backed web applications using server languages such as ASP, ASP.NET, ColdFusion Markup Language (CFML), JSP, and PHP.
Macintosh Interface:
Here at CI we will be using Dreamweaver on a Macintosh. But, FYI…the interface differs slightly from the PC interface. On the Mac, the document window and panels are free-floating and do not dock to one another where as on a PC all of the panels and windows are integrated.
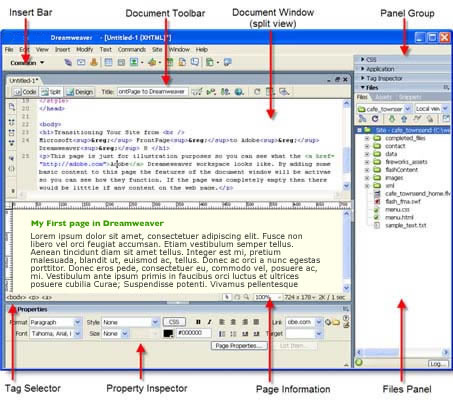
The Dreamweaver Interface
The Dreamweaver Interface is made up of a Document Window, Panels & Inspectors.
What are panels and inspectors?
- Panels are used to edit objects/elements on your web pages.
- An Inspector such as the Properties panel in Dreamweaver changes it’s appearance and options based on what tool or object is currently selected.
1) The Standard toolbar:
(not displayed in the default workspace layout) contains buttons for common operations from the File and Edit menus: New, Open, Save, Save All, Cut, Copy, Paste, Undo, and Redo. To display the Standard toolbar, choose View > Toolbars > Standard.

2) Insert bar:
If you don't see it, go to Windows>Insert or Cmd F2.
You can choose to show this bar as a menu or tabs. (right-click on the word Insert)
The insert bar contains buttons for inserting various types of “objects,” such as images, tables, and layers, into a document. Each object is a piece of HTML code that allows you to set various attributes as you insert it. For example, you can insert an image by clicking the Image icon in the Insert bar. If you prefer, you can insert objects using the Insert menu instead of the Insert bar.
Insert bar: “menu” view with drop down menu expanded

Insert bar with “tab” view.
3) Document Toolbar:

The three buttons shown below let you view the current page in a different ways. You can work in either
Code View which lets you see the working page almost as it would appear in a browser,
Split Screen will let you view or modify the HTML code
Design View will display both the design view and the code
4) Panels and Panel groups:
On the right side of the screen are panels, these can be hidden, expanded, and moved to suit your requirements. Notice that each panel group has many controls. The indentations/dots or “gripper” on the left allows you to pull the panel away from the group to float the panel. The triangle (“twirlie”) allows you to open or close the panel, and on the far right you'll see an attributes menu. You will also find that each panel has a menu bar and sometimes even has drop down menus.
Note: Regarding Site Files (Site Manager): The "Files" panel only contains the assets tab on Macs. Alternatively the site manager can be viewed by going to the text menu bar and selecting Site => Site Files, or by using the keyboard command F8.
5) Document Window:
This is your main working area, where you create and edit files.
6) The Tag selector:
in the status bar at the bottom of the Document window shows the hierarchy of tags surrounding the current selection in Design view. Click any tag in the hierarchy to select that tag and all its contents. (Not visible in Code view, so not visible by default in Coder-style workspace layout.)
The window Size pop-up menu:
This lets you resize the Document window to predetermined or custom dimensions
Estimated download time:
This shows the the estimated document size and estimated download time for the page, including all dependent files such as images and other media files.
7) The Property inspector:
lets you view and change a variety of properties for the selected object or text. Each kind of object has different properties. (Not expanded by default in Coder-style workspace layout.)

8) Menu bar:
This gives you access to all of the available commands, lets you open and close windows, and open and close files.

9) Title Bar:
This tells you what program you are working in and the name of the folder and file you are working with. The asterisk at the end of the filename tells you that you have made changes to the document since the last time you saved the file.

10) The Files panel
This allows you to manage the files and folders that make up your site. It also provides a view of all the files on your local disk, much like Windows Explorer (Windows) or the Finder (Macintosh).
Other Panel/Inspector Information you should know:
Dreamweaver provides many other panels, inspectors, and windows not shown here, such as the History panel and the Code inspector. Most panels can be docked together into panel groups.
To open Dreamweaver panels, inspectors, and windows, use the Window menu. A check mark next to an item in the Window menu indicates that the named item is currently open (though it may be hidden behind other windows). To display an item that isn’t currently open, choose the item name from the menu.
If you can’t find a panel, inspector, or window that’s marked as open:
- choose Window > Arrange Panels to neatly lay out all open panels
Creating a New Page
After you've set up your local site, you can begin filling the site
with pages. To do that, you'll need to create a page, give it a title,
add some content to the page, and save it. To check your work, you
should view the page in one or more Web browsers before you upload it
to your Web server. Luckily, Dreamweaver makes it easy to view your
work in different browsers.
The first HTML page that you create in a new site should be the index page,
which is the page that a Web browser loads automatically when a visitor
goes to the site. Depending on how you are naming pages on your site,
the index page could have a variety of names, but it is most often
named index.html. After you create the index page, you will want to create other pages for the site.
As you'll see is often the case with Dreamweaver, there is more than
one way to do the task at hand. You can create a new page using the
Start Page, or you can use the New Document dialog.
Using the Start Page
The Start Page is the fastest way to create a new HTML page. It appears when you have closed all other document windows.
To create a new page from the Start Page:
- Close any open document windows.
The Start Page appears. Each of the items in the Start Page is a link.
- In the Create New section, click HTML.
Dreamweaver creates the new blank HTML page.
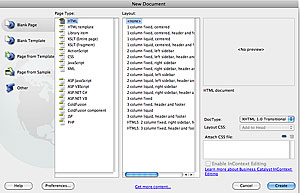
Using the New Document dialog
The New Document dialog gives you a bit more flexibility than the
Start Page when creating new documents. Like the Start Page, you can
create several different types of new documents, plus it allows you to
choose the doctype of the new document.
To create a new page from the New Document dialog:
- Choose File > New, or press Ctrl-N (Cmd-N).
The New Document dialog appears set to the General tab.
- Click
to choose one of the items in the Category column.
The second column changes to show the available items for the category
you selected. The name of this column also changes to match the name of
the category.
- Click
the item you want in the second column.
If Dreamweaver has a preview image of the item you selected available,
it will appear in the Preview pane (previews are mostly available for
sample pages and templates), with its description below the preview
area.
- Click Create.
Dreamweaver creates the new document and displays it in a new window.
|


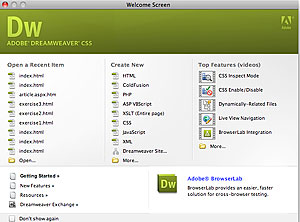 Click the links in the Start Page to open a recent item, create a new
item, or create a new item from Dreamweaver's sample pages.
Click the links in the Start Page to open a recent item, create a new
item, or create a new item from Dreamweaver's sample pages.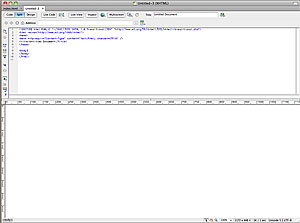 A brand-new page in Dreamweaver, showing the Design/Code view.